by admin | Sep 16, 2025 | Blog, E-commerce business owners
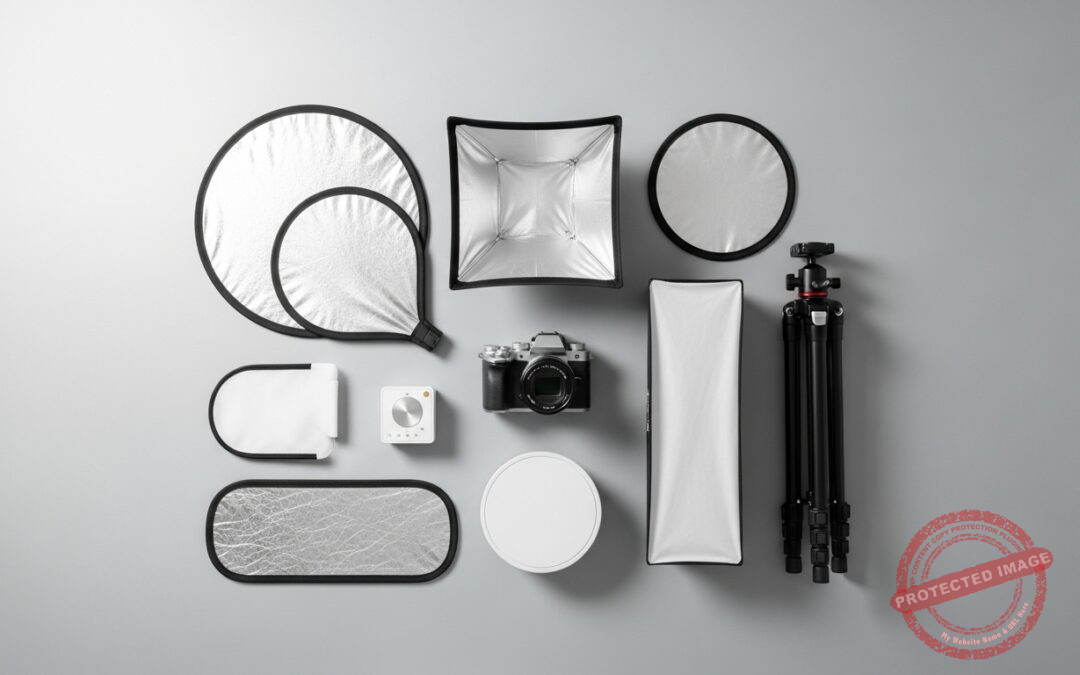
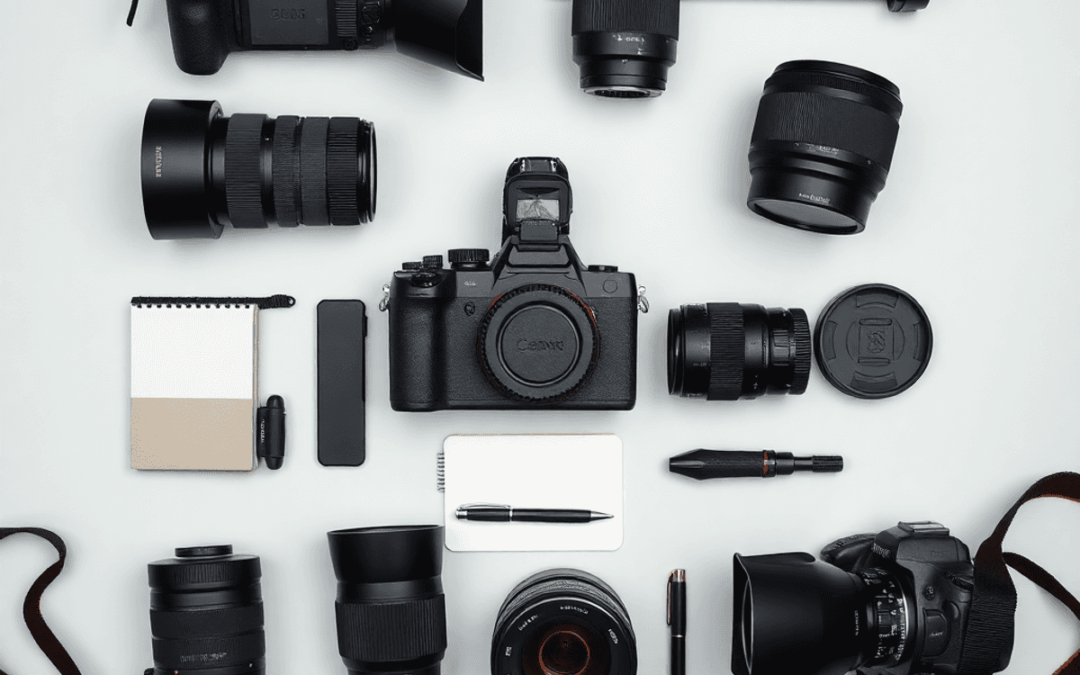
Investing in the right product photography equipment upgrades is crucial for anyone looking to elevate their e-commerce visuals and stand out in a crowded online marketplace. High-quality product images are not just aesthetically pleasing; they are a powerful sales tool, directly influencing customer perception and purchase decisions. In today’s visual-first world, blurry, poorly lit, or inconsistent photos can be a major deterrent, costing businesses valuable sales and brand credibility. This comprehensive guide will walk you through five must-have upgrades that can transform your product photography from amateur to professional. Whether you’re a small business owner on a budget or a seasoned e-commerce veteran, these equipment enhancements promise to improve clarity, consistency, and overall visual appeal, ultimately boosting your conversion rates and establishing a stronger online presence. Get ready to discover how targeted investments in your gear can yield significant returns.
Unlocking Potential with Essential Product Photography Equipment Upgrades
The journey to captivating product visuals often begins with understanding the impact of your gear. Many businesses start with basic setups, but as competition grows and visual standards rise, incremental product photography equipment upgrades become non-negotiable. These enhancements aren’t just about owning the latest gadget; they’re strategic investments designed to improve image quality, streamline workflows, and unlock creative possibilities that were previously out of reach. Professional-grade equipment ensures consistency in lighting, sharpness, and color accuracy across all your product listings, fostering trust with potential customers. This consistency is vital for brand recognition and customer loyalty, as it projects an image of professionalism and attention to detail. Furthermore, better equipment can significantly reduce post-production time, as you’ll be capturing higher-quality images straight out of the camera.
Investing in product photography equipment upgrades goes beyond technical specifications; it’s about investing in your brand’s visual narrative. Upgraded gear allows for greater control over every aspect of your shot, from intricate lighting nuances to precise depth of field, enabling you to highlight your product’s best features. For instance, a better lens can capture finer textures and details that a standard kit lens might miss, which is crucial for products like jewelry, textiles, or electronics. Enhanced lighting tools provide the flexibility to create various moods and styles, from bright and airy to dramatic and moody, aligning with your brand’s unique aesthetic. The visual impact of these upgrades translates directly into higher engagement rates, longer dwell times on product pages, and ultimately, increased sales. Customers are more likely to trust and purchase from a brand that presents its products clearly and attractively, making these upgrades a cornerstone of effective e-commerce strategy.
Key Insights: Making Smart Product Photography Equipment Upgrades
- Prioritize upgrades that directly address current image quality shortcomings and workflow inefficiencies.
- Invest in lighting first, as it has the most significant impact on product appearance and professionalism.
- A high-quality camera and specialized lenses, like macro or prime, are crucial for capturing fine details and creating stunning visual effects.
- Don’t overlook stability and backgrounds; a sturdy tripod and seamless backdrops are foundational for consistent, professional results.
- Consider automated tools like motorized turntables for enhanced customer experience with 360-degree product views.
- Smart upgrades not only enhance visual appeal but also streamline your photography process, saving time and resources.
Mastering Light: The Foundation of Stunning Product Shots
 The secret to professional-looking product photos often lies not in the camera, but in the lighting. Achieving the right illumination can make or break an image, transforming an ordinary product into something irresistible. When considering best product photography gear upgrades, advanced lighting solutions should be at the top of your list. Natural light is great, but it’s inconsistent and often insufficient for e-commerce. Dedicated lighting equipment provides control over direction, intensity, and quality of light, allowing you to highlight textures, minimize harsh shadows, and ensure accurate color representation. This control is vital for presenting your products consistently across all your listings, a key factor in building brand trust and recognition. Proper lighting can dramatically improve the clarity and appeal of your product images, making them pop off the screen and grab customer attention more effectively.
- Softboxes and Diffusers: These are essential for creating soft, even light that mimics natural window light. They reduce harsh shadows and hot spots, highlighting product details gently and making your items look more appealing and luxurious. Using one or two strategically placed softboxes can elevate your entire setup, making them indispensable for any serious product photographer.
- Ring Lights: Offering a unique, even glow that minimizes shadows, ring lights are particularly effective for close-up shots of smaller items like jewelry, electronics, or beauty products. They produce a distinctive circular catchlight that adds a professional touch and can make products sparkle.
- LED Light Panels: Versatile and often portable, LED panels provide consistent, flicker-free illumination with adjustable brightness and color temperature. This allows for precise control over the mood and accuracy of your product’s colors, crucial for maintaining brand consistency. Many models offer bi-color or RGB capabilities for creative effects.
- Reflectors: Simple yet incredibly effective, reflectors are tools for bouncing light back onto your product, filling in shadows and adding dimension without the need for additional light sources. Available in various colors (silver for crisp light, gold for warmth, white for neutral fill), they are an affordable way to refine your lighting setup.
Sharpen Your Focus: Camera and Lens Product Photography Equipment Upgrades
 While lighting forms the foundation, the camera and lens are your primary tools for capturing the actual image. Upgrading your camera body and, more importantly, your lenses, can dramatically improve image sharpness, color rendition, and overall visual fidelity. When considering product photography equipment upgrades, a common misconception is that you need the most expensive camera. Often, a mid-range mirrorless or DSLR camera paired with the right lens can outperform a high-end camera with a mediocre lens. The lens is where the magic truly happens, dictating how clearly and accurately your product is rendered. Investing in specialized lenses, such as macro or prime lenses, allows you to capture intricate details and create stunning visual effects that standard kit lenses simply cannot achieve, making your products irresistibly clear and appealing.
- Mirrorless Cameras: Offering excellent image quality, compact size, and advanced autofocus systems, mirrorless cameras are an increasingly popular choice for product photographers. They provide real-time previews of exposure and white balance, which simplifies the shooting process and ensures consistent results.
- Macro Lenses: Indispensable for capturing intricate details of small products, macro lenses allow for extremely close focusing distances, rendering textures, engravings, and fine features with breathtaking clarity. They are perfect for jewelry, electronics, cosmetics, and any item where tiny details are key to showcasing its quality.
- Prime Lenses: Known for their superior sharpness, wider apertures, and often more affordable price point compared to zooms, prime lenses (like a 50mm or 85mm) are excellent for isolating your product with beautiful background blur (bokeh). This makes the product truly stand out, drawing the viewer’s eye directly to it.
- Tilt-Shift Lenses: While an advanced investment, tilt-shift lenses offer unparalleled control over perspective and depth of field. They allow you to correct converging lines and maintain sharp focus across a wide plane, which is incredibly useful for capturing furniture, architecture, or complex product arrangements with perfect geometric accuracy.
Stable Shots and Seamless Backgrounds: Essential Photo Equipment for E-commerce
 Beyond lighting and cameras, the supporting cast of your photography setup plays an equally critical role in achieving professional results. Stability and a clean, consistent background are fundamental to high-quality product imagery. These elements are part of the essential photo equipment for e-commerce that often gets overlooked but can drastically impact the perceived quality of your product photos. A shaky camera can ruin an otherwise perfect shot, leading to blurriness and inconsistency, while a cluttered or inconsistent background distracts from your product. Investing in reliable tripods and versatile backdrop solutions ensures that your products are always presented in the best possible light, allowing them to truly shine without any distractions. These upgrades are foundational for maintaining a professional and cohesive visual identity for your brand.
- Sturdy Tripods: A stable, professional-grade tripod is non-negotiable for sharp, consistent images, especially in low light or when using longer exposures. It minimizes camera shake, ensures precise framing for multiple shots, and is crucial for creating composite images or stop-motion animations. Consistency in product positioning is key for e-commerce listings.
- Seamless Backdrops: White, grey, or colored seamless paper or vinyl backdrops create a clean, distraction-free environment that makes your product pop. This helps maintain a consistent brand aesthetic across all your product listings and makes post-processing, such as background removal, much easier and more efficient.
- Product Photography Light Tents/Cubes: These portable enclosures are designed to provide diffused, even lighting from all sides, simplifying setup and ensuring professional-looking results for smaller items. They are excellent for reducing reflections and creating soft, shadow-free illumination, making them ideal for jewelry, electronics, or small craft items.
- Motorized Turntables: For an immersive customer experience, motorized turntables are perfect for capturing 360-degree views of products. These allow customers to inspect every angle of an item, building confidence and helping them make informed purchasing decisions, especially for complex or multi-faceted products.
Ready to Transform Your E-commerce Visuals?
Upgrade your photography game today and see the difference professionally captured images can make. Contact us to make you the best product photography website for your business and elevate your brand’s online presence!
Frequently Asked Questions
What is the basic equipment for product photography?
Basic product photography equipment typically includes a camera (even a smartphone with a good lens), a tripod for stability, a light source (natural window light or a simple LED panel), and a clean background (like a white poster board or fabric).
Do I need an expensive camera for product photography?
Not necessarily. While high-end cameras offer more control and resolution, many successful e-commerce brands start with mid-range DSLRs or mirrorless cameras, or even advanced smartphone cameras, paired with good lighting and lenses. The right lens and proper lighting often matter more than the camera body itself.
How do I get professional lighting for product photography?
Professional lighting for product photography can be achieved with softboxes, LED light panels, or ring lights. These tools help create soft, even illumination, minimize harsh shadows, and highlight product details. Utilizing reflectors can also fill in shadows and enhance overall lighting quality.
What is the best lens for product photography?
For most product photography, a macro lens is highly recommended for capturing intricate details of small items. Prime lenses (like a 50mm or 85mm) are also excellent for sharpness and creating appealing background blur. The ‘best’ lens depends on the size and type of products you’re shooting.
[fluent_booking id=”1″]
by admin | Mar 25, 2025 | Blog
When it comes to showcasing properties, real estate photography equipment can make or break your success in 2025. High-quality visuals are no longer optional—they’re a necessity in today’s competitive market, where buyers judge listings within seconds online. Whether you’re a seasoned photographer or a real estate agent stepping up your game, having the right tools ensures your images stand out, attract more clicks, and ultimately drive sales.
With technology advancing rapidly, 2025 brings exciting innovations like AI-powered cameras and affordable drones that elevate property photography to new heights. In this guide, we’ll dive into the top picks for real estate photography equipment, helping you invest wisely and capture stunning shots that sell homes faster. Let’s explore what’s essential for your kit this year!
Real Estate Photography Equipment: Why It Matters
When it comes to selling properties, real estate photography equipment isn’t just a tool—it’s your competitive edge. High-quality visuals can transform a listing, grabbing buyers’ attention and driving sales in a crowded 2025 market. But why does your gear matter so much? Here’s a listicle breaking down the key reasons:
- First Impressions Count: Listings with professional photos sell 32% faster, per VHT Studios, because crisp, vibrant images hook buyers instantly. Quality real estate photography equipment ensures your shots stand out on platforms like Zillow or Redfin.
- Showcase Space Effectively: Wide-angle lenses and high-resolution cameras capture expansive interiors, making rooms feel larger and more inviting—crucial for small or tricky layouts.
- Boost Perceived Value: Sharp, well-lit photos elevate a property’s appeal, convincing buyers it’s worth the price tag. Skimp on gear, and you risk dim, blurry shots that scream “budget listing.”
- Save Time with Tech: Modern equipment, like AI-powered cameras, streamlines shooting and editing. Spend less time tweaking and more time landing clients.
- Stay Ahead of Trends: In 2025, drones and 360-degree tools are standard for top-tier listings. Investing in cutting-edge real estate photography equipment keeps you relevant.
Upgrading your kit isn’t just about better photos—it’s about faster sales, happier clients, and a stronger reputation. Whether you’re a real estate agent or a pro photographer, the right tools make all the difference in today’s visual-first market.
Real Estate Photography Equipment: Key Takeaways
Here’s what you need to know about real estate photography equipment in 2025:
- High Resolution Matters: Cameras with at least 30MP ensure sharp, detailed images for large prints or virtual tours.
- Wide-Angle Lenses Are Essential: They capture expansive interiors, making rooms appear larger and more inviting.
- Stability Boosts Quality: Tripods eliminate blur, especially in low-light settings like twilight shoots.
- AI Enhances Efficiency: Tools with AI features streamline editing, saving hours on post-processing.
Cameras: The Heart of Your Photography Gear
 Your camera is the cornerstone of your real estate photography equipment. In 2025, mirrorless options dominate due to their portability and advanced features. The Sony Alpha a7 IV, with its 33MP sensor and stellar low-light performance, is a top pick for capturing vibrant interiors and exteriors alike.
Here’s a quick list of must-have camera features:
- Full-Frame Sensor: Delivers superior dynamic range for balanced lighting.
- Fast Autofocus: Ensures sharp shots, even in dim rooms.
- Bracketing Options: Perfect for HDR photography, a staple in real estate.
For a budget-friendly alternative, the Canon EOS R8 offers solid performance. Check out Sony’s official site for specs.
Lenses: Framing Properties Perfectly with Real Estate Photography Equipment
 Lenses are vital to your real estate photography equipment arsenal, shaping how properties are perceived. Wide-angle lenses like the Canon EF 16-35mm f/2.8L III USM excel at showcasing roomy interiors without distortion. Tilt-shift lenses, such as the Nikon PC-E 24mm, correct perspective for tall exteriors—a must for luxury listings.
Key lens considerations include:
- Focal Length (14-35mm): Ideal for wide shots of small spaces.
- Aperture (f/2.8 or lower): Enhances low-light performance.
- Sharpness: Ensures every detail, from textures to fixtures, shines.
Learn more at Canon’s lens guide.
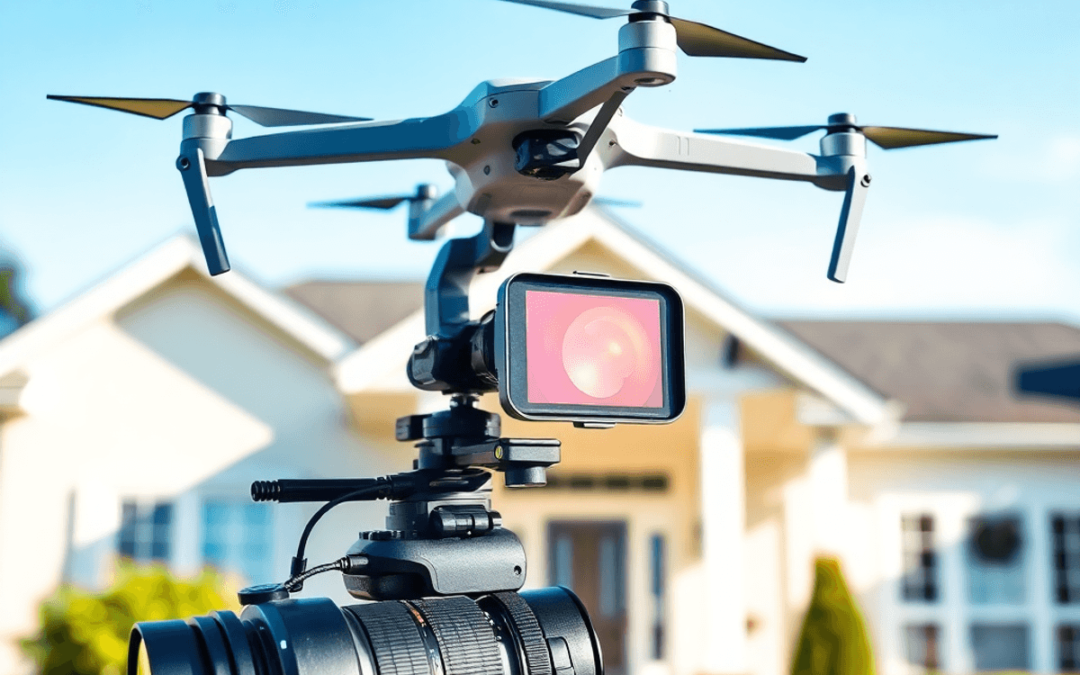
Drones: Elevating Your Property Photography Tools
 Drones are revolutionizing property photography tools in 2025, offering breathtaking aerial shots that sell homes 68% faster (MLS stats). The DJI Mavic 3 Pro, with its 8K video and long battery life, tops the list for showcasing sprawling estates and neighborhoods.
Benefits of drones include:
- Unique Angles: Highlight lot size and surroundings.
- Affordability: Prices drop as tech improves—expect $500-$1,000 ranges.
- Ease of Use: Intuitive controls suit beginners and pros alike.
Explore options via DJI’s official site.
Call to Action
Ready to upgrade your website for real estate photography ? Reach us here, subscribe for weekly gear tips here, and improve your property shots in 2025. Don’t miss out—click here to book us for your blog writing!
FAQs
What’s the Best Camera for Real Estate Photography in 2025?
The Sony Alpha a7 IV leads with its 33MP sensor and AI autofocus, perfect for crisp property shots.
Are Drones Worth It for Property Photography Tools?
Yes! Aerial shots boost engagement by 83%, making drones a smart investment for standout listings.
How Much Should I Spend on Real Estate Photography Equipment?
A solid setup (camera, lens, tripod) ranges from $1,500-$3,000, depending on your needs.
Can Smartphones Replace Dedicated Photography Gear?
Not quite—while advanced, they lack the resolution and lens versatility of dedicated cameras.
[fluent_booking id=”1″]
by admin | Mar 20, 2025 | Blog
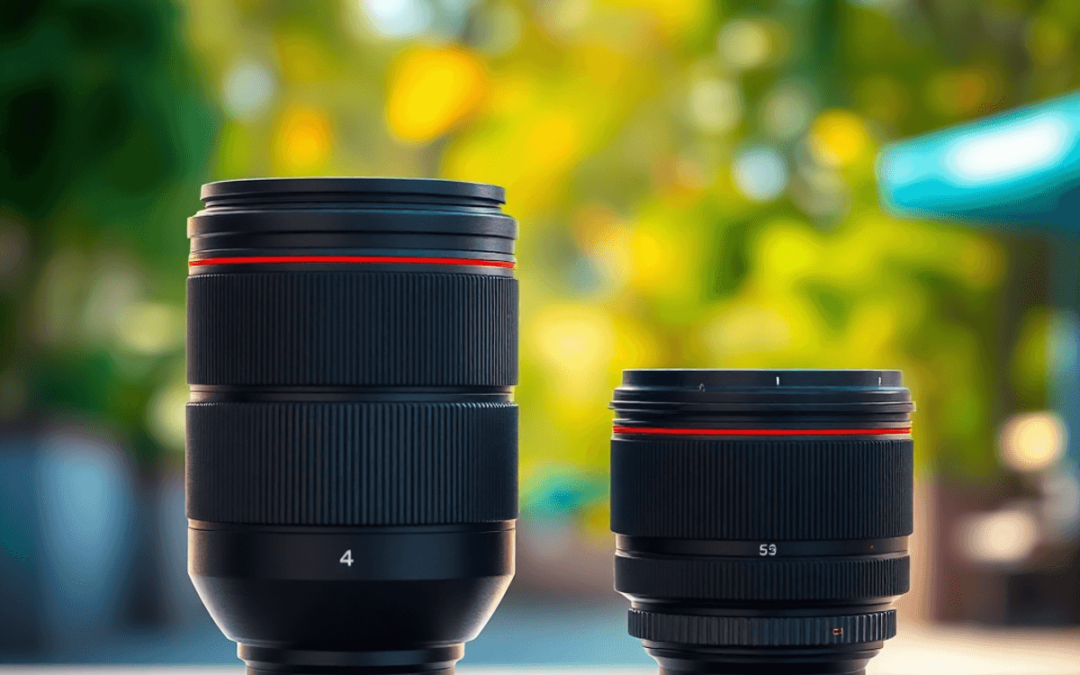
When it comes to choosing between Tamron vs Sigma 70-200 lenses, photographers face a tough decision—both brands offer exceptional 70-200mm f/2.8 options that promise stellar image quality and versatility. These telephoto lenses are staples for portrait, sports, and wildlife photography, but each has unique strengths and trade-offs.
With the Tamron SP 70-200mm f/2.8 Di VC USD G2 and the Sigma 70-200mm f/2.8 DG OS HSM Sport leading the pack, understanding their differences can save you time, money, and frustration. Whether you’re a hobbyist upgrading your kit or a pro seeking the perfect workhorse lens, this guide breaks down the pros, cons, and best choice for your needs. Let’s dive into the details and help you pick the winner!
Tamron vs Sigma 70-200: Overview
The Tamron vs Sigma 70-200 debate pits two top-tier 70-200mm f/2.8 lenses against each other, each with unique strengths for photographers. Wondering what makes these lenses tick? Here’s a listicle-style breakdown of the essentials:
- Meet the Contenders:
- Tamron SP 70-200mm f/2.8 Di VC USD G2: Launched in 2017, this lens is a lightweight favorite known for value and performance.
- Sigma 70-200mm f/2.8 DG OS HSM Sport: Released in 2018, it’s a rugged powerhouse built for pros who need durability.
- Core Features They Share:
- Constant f/2.8 aperture for low-light shooting and creamy bokeh.
- Image stabilization (VC for Tamron, OS for Sigma) to reduce shake.
- Weather sealing to handle dust, splashes, and tough conditions.
- Weight and Portability:
- Tamron weighs 1,485g—easier on your shoulders during long shoots.
- Sigma clocks in at 1,805g—sturdier but heftier for all-day use.
- Price Tag Showdown:
- Tamron retails around $1,299—a budget-friendly steal.
- Sigma’s $1,499 price reflects its premium build and features.
- Why It Matters:
- In the Tamron vs Sigma 70-200 face-off, Tamron wins for portability and cost, while Sigma shines for toughness and optics. Your choice depends on your shooting style and wallet!
This overview sets the stage for a deeper dive into the pros, cons, and best use cases. Ready to see how they stack up?
Tamron vs Sigma 70-200: Key Takeaways
Here’s a quick rundown of the standout features in the Tamron vs Sigma 70-200 comparison:
- Tamron Pros: Lightweight, affordable, excellent sharpness at 70mm, 5-year warranty.
- Tamron Cons: Slower autofocus in low light, zoom ring rotates opposite to Nikon/Canon.
- Sigma Pros: Superior build quality, fast and accurate autofocus, minimal focus breathing.
- Sigma Cons: Heavier, pricier, stiffer zoom ring.
- Best For: Tamron suits budget-conscious shooters; Sigma excels for pros needing durability.
Key Point #1: Image Quality Comparison
 When comparing Tamron vs Sigma 70-200 lenses, image quality is a top priority. Both deliver impressive sharpness and vibrant colors, but their strengths differ across the focal range. Tamron shines at 70mm, offering edge-to-edge clarity that rivals pricier first-party lenses. Sigma, however, maintains consistency from 70mm to 200mm, with less chromatic aberration—ideal for this telephoto lens comparison.
Here’s how they stack up:
- Tamron Sharpness: Outstanding at shorter focal lengths, slightly softer at 200mm.
- Sigma Sharpness: Uniformly sharp throughout, perfect for detailed shots.
- Bokeh Quality: Sigma’s 11 aperture blades create smoother backgrounds than Tamron’s 9.
- Distortion: Both control it well, but Sigma edges out with better corner performance.
For more on lens sharpness metrics, check out DxOMark’s lens testing.
Key Point #2: Build and Handling – Tamron vs Sigma 70-200
 The Tamron vs Sigma 70-200 showdown also hinges on build quality and usability. Tamron’s G2 is a lightweight champ, making it easier to carry during long shoots. Sigma’s Sport version, built like a tank, is weather-sealed to withstand harsh conditions—think rain-soaked sports events or dusty trails.
Key differences include:
- Weight: Tamron (1,485g) vs. Sigma (1,805g)—a big deal for handheld shooting.
- Autofocus: Sigma’s HSM is faster and quieter than Tamron’s USD, especially for action.
- Stabilization: Both offer solid OS/VC, but Sigma’s customizable modes add versatility.
- Feel: Sigma’s stiffer zoom ring may slow you down; Tamron’s is smoother.
Learn more about lens durability from PetaPixel’s Sigma 70-200mm review.
Key Point #3: Value for Money

Price often tips the scales in the Tamron vs Sigma 70-200 debate. Tamron’s lower cost and long warranty make it a standout in the best 70-200mm lens category for budget buyers. Sigma, while pricier, justifies its cost with premium features pros crave.
Consider these factors:
- Cost: Tamron ($1,299) saves you money upfront vs. Sigma ($1,499).
- Warranty: Tamron’s 5 years beats Sigma’s 4-year US coverage.
- Resale Value: Sigma holds value better due to its robust build.
- Extras: Sigma includes an Arca-Swiss tripod foot—Tamron’s is optional.
Call to Action
Ready to pick your winner in the Tamron vs Sigma 70-200 battle? Subscribe now for more gear reviews, photography tips, and exclusive updates to level up your skills. Click here to subscribe and never miss a post—also book us for your website design and blog article writing!
FAQs
What’s the main difference between Tamron and Sigma 70-200mm lenses?
Tamron is lighter and cheaper, with great sharpness at 70mm, while Sigma offers better build quality, faster autofocus, and consistency across the range.
Which lens is better for sports photography?
Sigma’s 70-200mm f/2.8 Sport excels with faster autofocus and rugged durability, making it ideal for action shots.
Is the Tamron 70-200mm G2 worth it in 2025?
Yes, its affordability, lightweight design, and solid image quality make it a strong contender for budget-conscious shooters.
Can I use these lenses on mirrorless cameras?
Both adapt well to mirrorless systems (e.g., Canon R6, Nikon Z6) with the right adapter, retaining full functionality.
[fluent_booking id=”1″]
by admin | Mar 17, 2025 | Blog
As a photographer, your photographic equipment is more than just tools—it’s your livelihood. From high-end cameras to specialized lenses, your gear represents a significant investment. But what happens if your equipment is stolen, damaged, or lost? That’s where insuring photographic equipment comes in.
In this guide, we’ll walk you through everything you need to know about protecting your gear in 2025. Whether you’re a professional or a hobbyist, understanding your insurance options can save you from costly setbacks and give you peace of mind. Let’s dive in!
Why Insuring Photographic Equipment is Essential
Your photographic equipment is vulnerable to a variety of risks, including theft, accidents, and natural disasters. Without proper insurance, replacing or repairing your gear can be financially devastating. Here’s why insuring your equipment is a must:
- Financial Protection: Covers the cost of repairs or replacements.
- Peace of Mind: Allows you to focus on your craft without worrying about potential losses.
- Professional Requirements: Many clients and venues require proof of insurance.
By the end of this guide, you’ll have a clear understanding of how to choose the right insurance policy for your needs.
5 Key Takeaways for Insuring Photographic Equipment
Here’s a quick overview of what we’ll cover:
- Understand Your Coverage Needs
- Compare Insurance Providers
- Know What’s Covered (and What’s Not)
- Consider Additional Coverage Options
- Document Your Gear for Claims
Key Point #1: Understand Your Coverage Needs
") Before choosing a policy, it’s crucial to assess your photographic equipment and determine your coverage needs. Ask yourself:
Before choosing a policy, it’s crucial to assess your photographic equipment and determine your coverage needs. Ask yourself:
- What is the total value of my gear?
- Do I travel frequently with my equipment?
- Am I covered under my homeowner’s or renter’s insurance?
For example, if you’re a travel photographer, you’ll need a policy that covers international theft and damage. Understanding your specific needs will help you avoid overpaying for unnecessary coverage.
Key Point #2: Compare Insurance Providers
")
Not all insurance providers are created equal. When insuring photographic equipment, it’s essential to compare options to find the best fit. Here’s what to look for:
- Reputation: Choose providers with positive reviews and a strong track record.
- Coverage Limits: Ensure the policy covers the full value of your gear.
- Deductibles: Opt for a deductible that fits your budget.
Companies like Photography Insurance and Front Row Insurance specialize in camera insurance and offer tailored solutions for photographers.
Key Point #3: Know What’s Covered (and What’s Not)
") When insuring photographic equipment, it’s crucial to read the fine print. Policies vary, and some may exclude certain types of damage or theft. Here’s a breakdown of common coverage areas:
When insuring photographic equipment, it’s crucial to read the fine print. Policies vary, and some may exclude certain types of damage or theft. Here’s a breakdown of common coverage areas:
- Theft: Covers stolen equipment, even during travel.
- Accidental Damage: Includes drops, spills, and other mishaps.
- Natural Disasters: Protects against floods, fires, and earthquakes.
However, some policies may exclude wear and tear or damage caused by negligence. Always clarify these details before signing up.
Key Point #4: Consider Additional Coverage Options
") Beyond basic coverage, you may want to explore additional options to fully protect your photographic equipment. These include:
Beyond basic coverage, you may want to explore additional options to fully protect your photographic equipment. These include:
- Liability Insurance: Covers damages or injuries caused by your gear.
- Rental Equipment Coverage: Protects rented or borrowed gear.
- Business Interruption Insurance: Compensates for lost income due to equipment loss.
These add-ons can provide extra security, especially for professional photographers.
Key Point #5: Document Your Gear for Claims
")
In the event of a claim, proper documentation is essential. Here’s how to prepare:
- Create an Inventory: List all your gear, including serial numbers and purchase dates.
- Take Photos: Capture images of your equipment from multiple angles.
- Keep Receipts: Store digital or physical copies of purchase receipts.
This documentation will streamline the claims process and ensure you receive fair compensation.
Call to Action
Don’t wait until it’s too late—protect your photographic equipment today! Get a free quote for your photography website design and enjoy our premium blog for your brand that will get your organic traffic from google. Get Your Free Quote Now
For more tips on protecting your photography business, subscribe to our newsletter. Subscribe Here
FAQs
1. Is my photography gear covered under homeowner’s insurance?
Some homeowner’s policies may cover personal belongings, but they often have limits and exclusions. A dedicated camera insurance policy is recommended for full coverage.
2. How much does it cost to insure photographic equipment?
Costs vary based on the value of your gear and coverage options. On average, expect to pay 1-2% of your equipment’s total value annually.
3. Can I insure used or vintage photography equipment?
Yes, many providers offer coverage for used or vintage gear. Be sure to provide accurate valuations and documentation.
4. What should I do if my equipment is stolen?
File a police report immediately, then contact your insurance provider to start the claims process. Proper documentation will expedite your claim.
By following this guide, you’ll be well-equipped to protect your photographic equipment and focus on what you do best—capturing stunning images. Don’t wait; secure your gear today!
[fluent_booking id=”1″]
by admin | Mar 15, 2025 | Blog
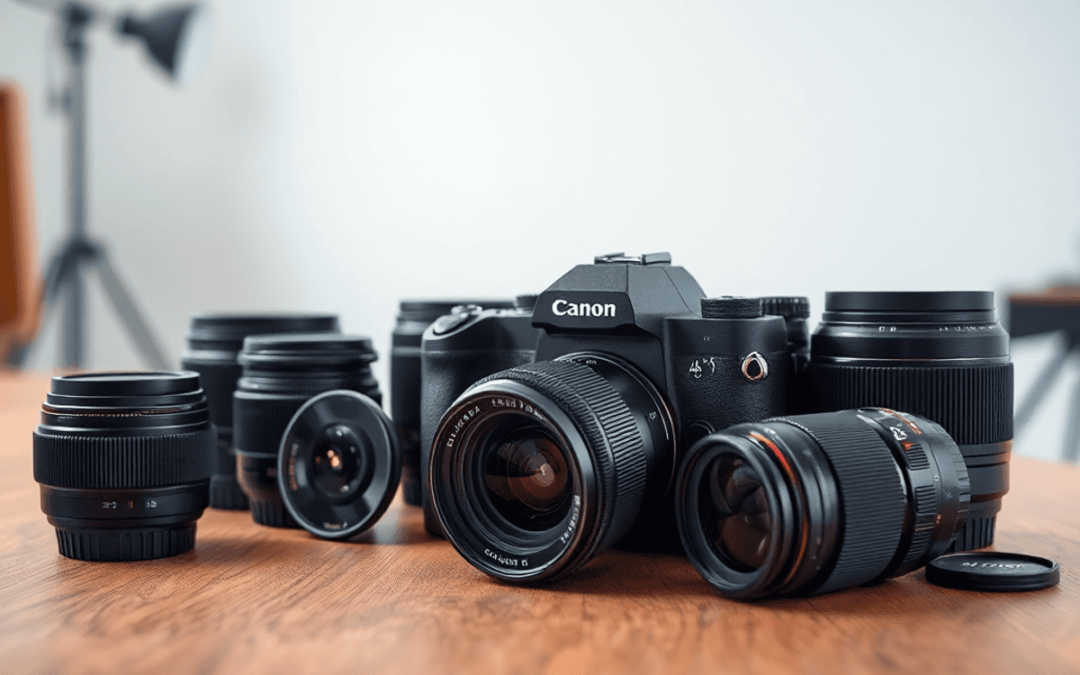
Choosing the best professional photography equipment can be overwhelming, especially with the vast array of options available today. Whether you’re a seasoned photographer or just starting, the right gear can make all the difference in capturing stunning images. From cameras and lenses to lighting and accessories, every piece of equipment plays a crucial role in your creative process.
In this guide, we’ll walk you through five essential tips to help you select the best professional photography equipment for your needs. By the end, you’ll have a clear understanding of what to look for and how to make informed decisions that align with your photography goals.
Why Choosing the Right Professional Photography Equipment Matters
Investing in the best professional photography equipment is not just about having the latest gadgets; it’s about finding tools that enhance your creativity and efficiency. The right gear can help you:
- Achieve higher image quality.
- Work more efficiently in different shooting conditions.
- Expand your creative possibilities.
For example, a high-quality lens can drastically improve sharpness and depth of field, while a reliable camera body ensures consistent performance in various environments. Understanding your needs and budget is the first step toward making the right choices.
5 Key Takeaways for Choosing Professional Photography Equipment
Here’s a quick overview of what we’ll cover:
- Understand Your Photography Style
- Set a Realistic Budget
- Prioritize Essential Gear
- Research and Compare Brands
- Test Before You Buy
Key Point #1: Understand Your Photography Style

Your photography style is the foundation for choosing the right equipment. Are you into portrait photography, landscapes, or action shots? Each genre requires specific tools. For instance:
- Portrait Photographers: Prioritize lenses with wide apertures (e.g., 50mm f/1.8) for beautiful bokeh.
- Landscape Photographers: Opt for wide-angle lenses and sturdy tripods.
- Action Photographers: Look for cameras with fast autofocus and high burst rates.
Understanding your niche will help you avoid unnecessary purchases and focus on gear that truly enhances your work.
Key Point #2: Set a Realistic Budget

When it comes to professional photography equipment, costs can add up quickly. Setting a realistic budget is crucial to avoid overspending. Here’s how to approach it:
- Prioritize Essentials: Start with a good camera body and a versatile lens.
- Consider Used Gear: Reputable sellers offer high-quality used equipment at lower prices.
- Plan for Upgrades: Allocate funds for future upgrades as your skills grow.
Remember, expensive gear doesn’t always mean better results. Focus on tools that align with your needs and skill level.
Key Point #3: Prioritize Essential Gear

Not all photography gear is created equal. Start with the essentials and build your kit over time. Here’s a checklist:
- Camera Body: Choose one that suits your style (DSLR, mirrorless, etc.).
- Lenses: Invest in a versatile zoom lens or prime lenses for specific needs.
- Tripod: Essential for stability, especially in low-light conditions.
- Lighting: Consider external flashes or softboxes for controlled lighting.
- Accessories: Memory cards, extra batteries, and a reliable camera bag.
By focusing on the essentials, you’ll avoid clutter and ensure you have the tools you need for most shooting scenarios.
Key Point #4: Research and Compare Brands

With so many brands offering professional photography equipment, it’s important to do your homework. Here’s how to compare effectively:
- Read Reviews: Check expert opinions and user feedback.
- Compare Features: Look for features that matter most to your style.
- Consider Ecosystem: Some brands offer a wide range of compatible lenses and accessories.
Brands like Canon, Nikon, and Sony are popular choices, but don’t overlook smaller brands that might offer unique features or better value.
Key Point #5: Test Before You Buy
 Before committing to any professional photography equipment, it’s crucial to test it out. Here’s why:
- Ergonomics: Ensure the camera feels comfortable in your hands.
- Performance: Test autofocus, low-light capabilities, and ease of use.
- Compatibility: Make sure it works well with your existing gear.
Visit a local camera store or rent equipment to try it out in real-world conditions. This hands-on approach can save you from costly mistakes.
Call to Action
Ready to elevate your photography game? Explore our recommended professional photography equipment and book us for your website development or blog post writing! Book Us Now
Don’t forget to subscribe to our newsletter for more tips and guides on photography gear. Subscribe Here
FAQs
1. What is the most important piece of photography equipment?
The camera body and lens are the most critical components. Invest in a reliable camera and versatile lenses to cover a range of shooting scenarios.
2. How much should I spend on professional photography equipment?
It depends on your budget and needs. Start with essentials and gradually invest in additional gear as your skills and requirements grow.
3. Should I buy new or used photography equipment?
Both options have pros and cons. New gear comes with warranties, while used equipment can save you money. Always buy from reputable sellers.
4. What’s the best camera brand for professional photography?
Popular brands like Canon, Nikon, and Sony are excellent choices, but the best brand depends on your specific needs and preferences.
[fluent_booking id=”1″]